Apache Airflow 3 Fundamentals – Certification Exam
Prerequisite: Install and run Airflow using Astro
Ask Astro: https://ask.astronomer.io/ is the Apache Airflow’s AI language model.
Astro CLI is an open-source, fully managed Airflow solution. It is the easiest and fastest way to set up and run Airflow locally.
Prerequisites
Install Homebrew: https://brew.sh/
Install Docker: https://www.docker.com/
Install the Astro CLI
brew install astro → install the Astro CLI
astro version → check that the installation was successful
brew upgrade astro → upgrade the Astro version
brew uninstall astro → uninstall Astro
Create an Astro project
See the full instruction: https://www.astronomer.io/docs/astro/cli/get-started-cli
astro dev init → generate new project
All required project files will automatically be created. Most important are:
dags→ the main folder for DAG pipelines (python scripts)include→ put here any additional scripts like SQL queries or bash scriptsplugins→ additional custom components like operators, hooks, sensors, etc..env→ environment variablesrequirements.txt→ additional python packages
By default, Airflow timezone is set to UTC. This can be changed using the AIRFLOW__CORE__DEFAULT_TIMEZONE variable.
Run Airflow locally
astro dev start → run the project locally
This command spins up 5 Docker containers on your machine: postgres, api server, dag processor, scheduler and triggerer.

After your project builds successfully, open the Airflow UI in your web browser at https://localhost:8080/.
astro dev restart → restart the project
astro dev stop → stop the project
astro dev kill → delete the project with all metadata
Run Astro project from Visual Studio Code
- install the
Dev Containersextension - Terminal > New Terminal
astro dev start- click on the icon on the bottom left (Open a Remote Window)
- choose: Attach to Running Container
- select the scheduler container (a new window will open)
- File > Open Folder
/usr/local/airflow> OK
Now, the Visual Studio Code is running inside the Docker container corresponding to the Airflow Scheduler.
To close the connection:
- click on the bar on the bottom left (the blue one with the name of the container)
- Close Remote Connection
Topic 1: Airflow Use Cases
Apache Airflow is a data orchestrator
↳ It manages the process of moving data between various data tools.
↳ It coordinates and automates data flows across various tools and systems.
↳ It allows to programmatically author, schedule and monitor workflows.
Brief orchestration / workflow management history
1) Pre-unix era:
↳ manual batch processing and scheduling
↳ error prone
2) Early computing:
↳ basic time-based scheduling (e.g. CRON for Linux)
↳ rise of ETL tooling (e.g. Informatica) → expensive and resource intensive
3) Data and open-source:
↳ rise of tools like Luigi or Oozie
↳ limitations: some tools working only with Hadoop ecosystem, limited scalability, XML or config files used to define workflows
4) Modern data orchestration:
↳ Apache Airflow (2015)
↳ open-source
↳ pipelines as code in Python
↳ integration with hundreds of external systems
↳ time and event-based (data aware) scheduling
Airflow is suitable only for batch processing (not streaming) but it can be used with Kafka.
Airflow can process (transform) data but it is not specifically designed for that (as a best practice use dedicated external systems like Spark and always carefully consider available Airflow resources).
Topic 2: Airflow Concepts
DAG = Directed Acyclic Graph → a single data pipeline
Task → a single unit of work in a DAG → represented by a single node
Operator → defines the work a task does → there are 900+ built-in operators
directed => if multiple tasks exist, each must have at least one defined upstream or downstream task
acyclic => there are no loops
Core Airflow components
Airflow has seven main components.
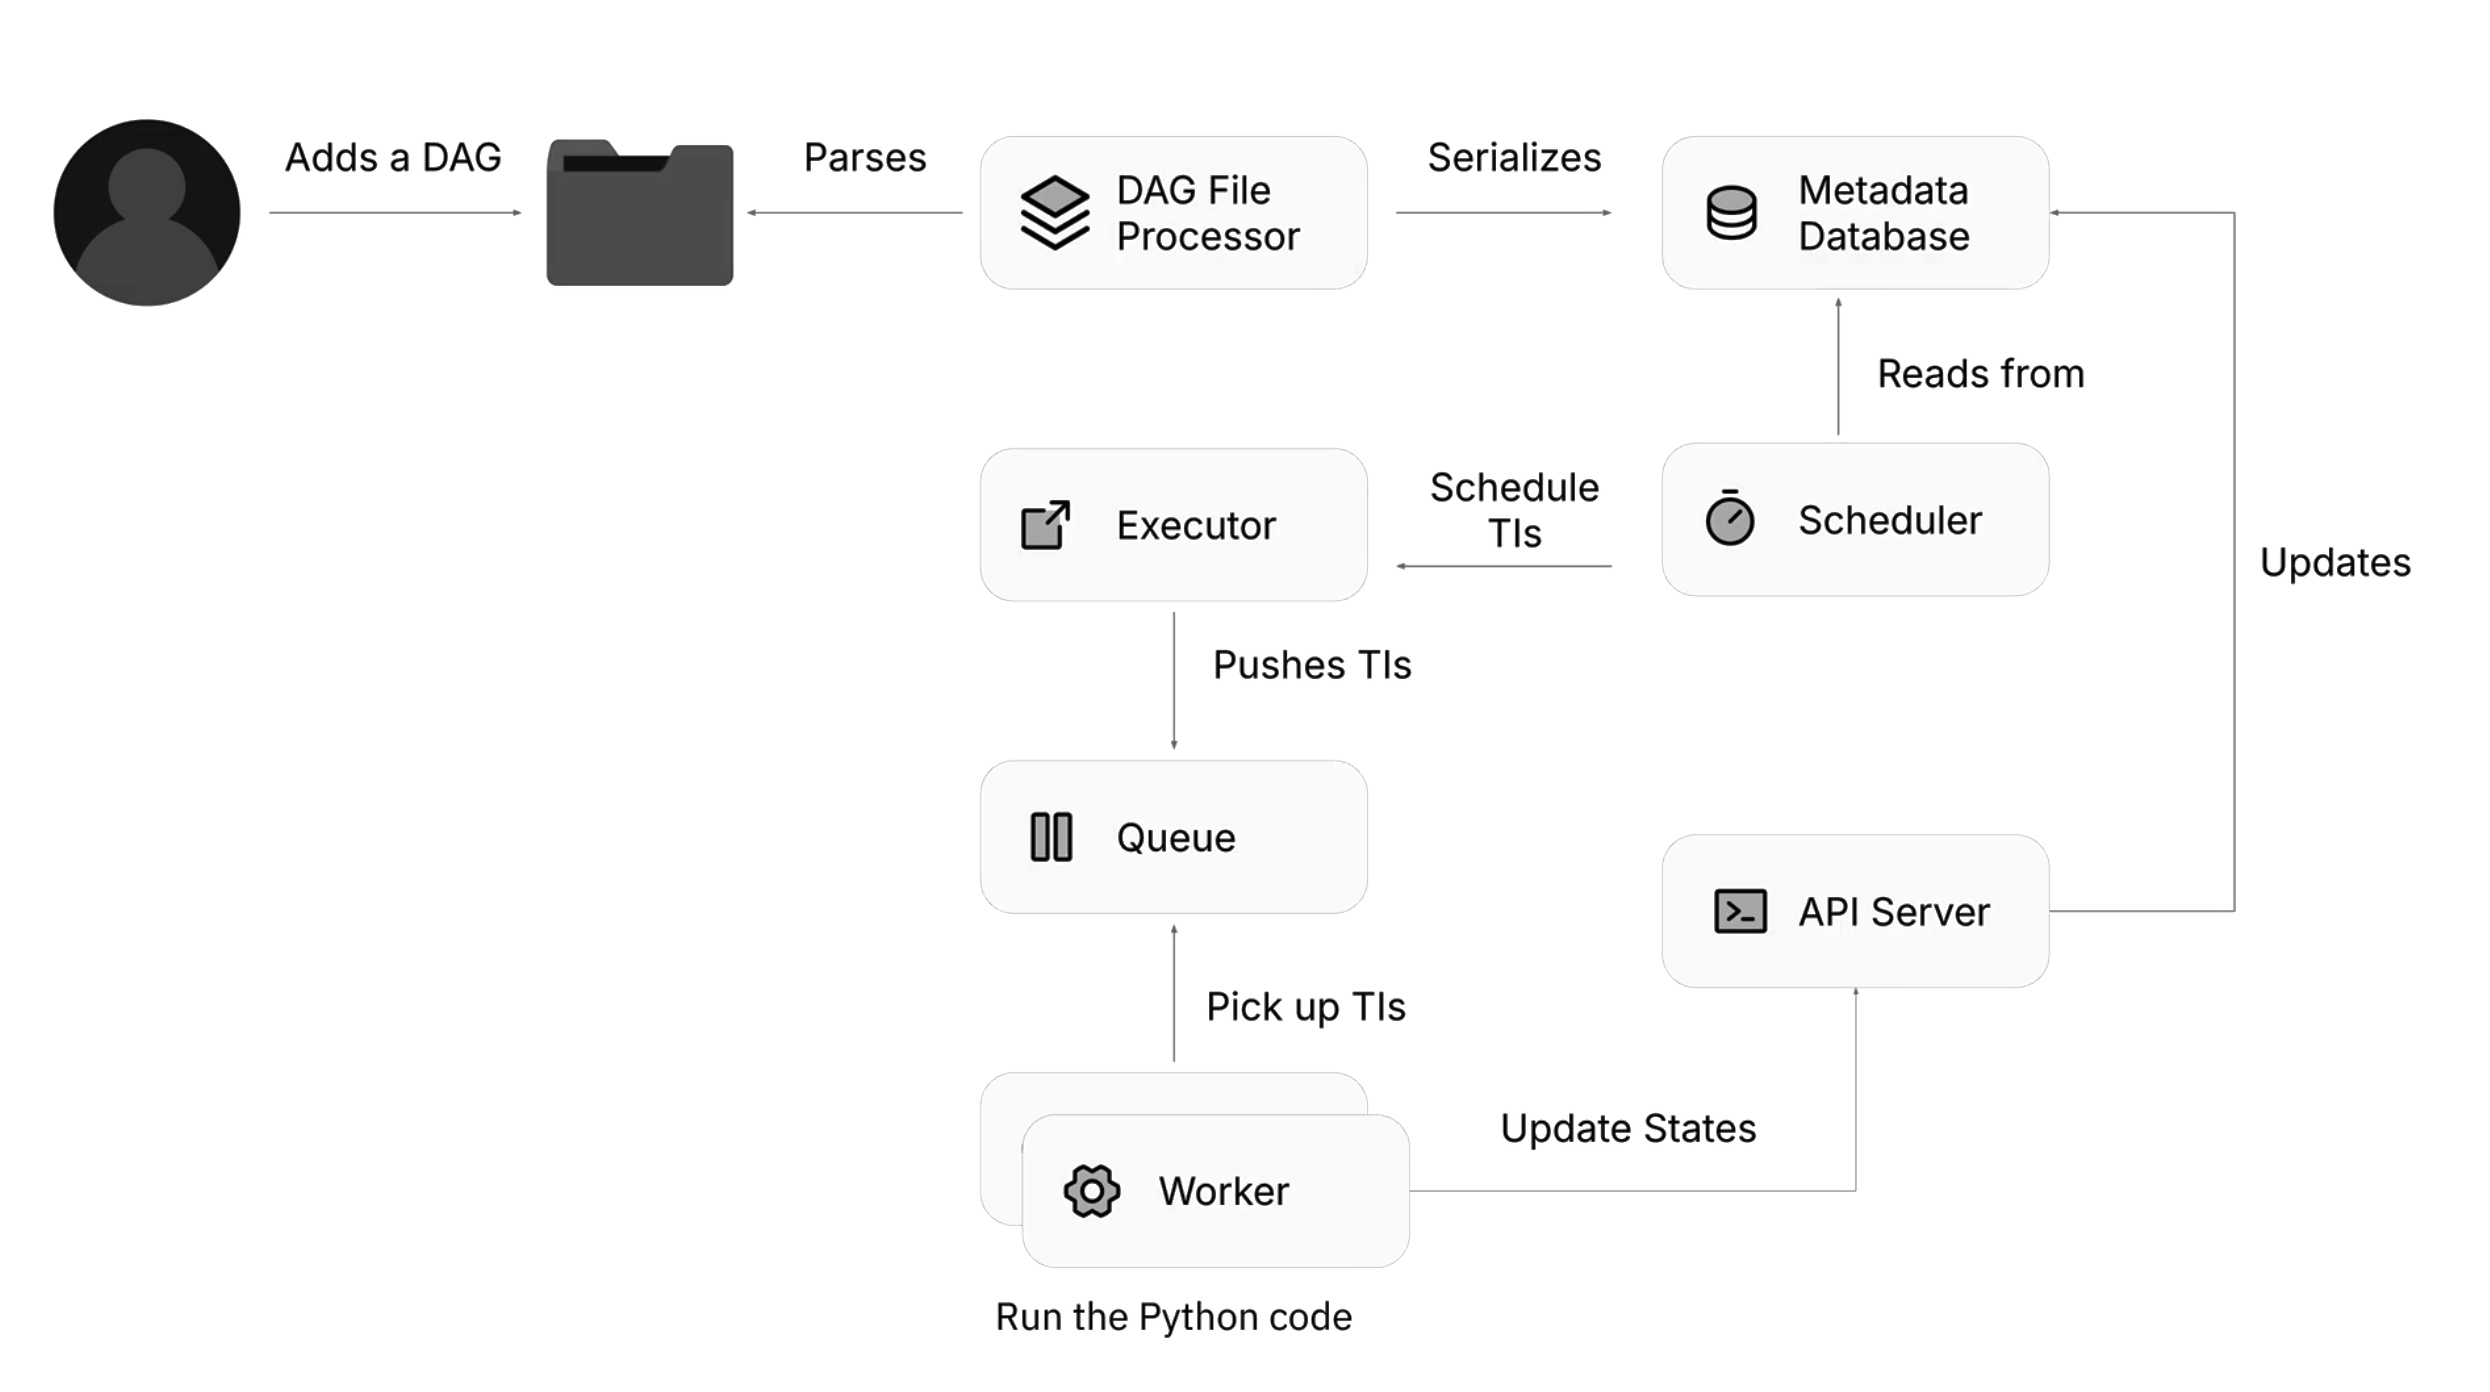
Metadata Database
Used to store all metadata related to the Airflow instance.
DAG File Processor
A dedicated process for retrieving and parsing DAG files from the dags folder. By default looks for new DAGs to parse every 5 minutes.
Serialized DAG file is written to Metadata Database.
Scheduler
Monitors and schedules tasks when the dependencies are met.
↳ by default reads from the Metadata Database every 5 seconds to check if there are any tasks to run
↳ creates and schedules Task Instance objects
↳ designed to run as a persistent service (continuously run in the background for an extended period)
↳ can be run on a single machine or distributed across multiple machines
↳ multiple schedulers can run at the same time
↳ once scheduler is started, it continues to run until explicitly stopped manually or by the system
API Server
API Server takes information from workers about tasks statuses and updates the Metadata Database.
API Server also serves the Airflow UI (React-based).
In Airflow 3, the flask-based Webserver and API logic from Airflow 2, was merged into a single API Server.
Executor
Defines how tasks are executed and on which system.
Pushes the Task Instance objects into Queue.
Queue
Holds the tasks that are ready to be executed and defines the execution order.
Worker(s)
Executes tasks. Picks up Task Instance objects from the Queue and runs the code.
Communicates the Tasks statuses to the API Server.
There can be multiple workers. They can be put in a separate cluster.
Stages of running a DAG
1) the DAG File Processor scans the dags directory for new files (by default every 5 minutes)
2) after the DAG File Processor detects a new DAG, this DAG is parsed and serialized into the Metadata Database
3) the Scheduler checks the Metadata Database (by default every 5 seconds) for DAGs that are ready to run
4) once the DAG is ready to run, its tasks are put into the executor’s queue
5) once a worker is available, it will retrieve a task to execute from the queue
6) the worker executes the taks
Airflow providers
Core capabilities of Airflow can be extended by installing additional packages called providers.
You can search for different providers on https://registry.astronomer.io/
Defining a DAG in Airflow
A DAG has 4 core parts:
- the import statements where the needed operators or classes are imported
- the DAG definition, where the DAG object is called and its properties are defined
- the DAG body where tasks are defined with the operators they will run
- the dependencies where the order of execution of the tasks is defined
There are 3 ways to declare a DAG: 1) using the @dag decorator 2) using the context manager (with statement) 3) using the standard constructor
Using the DAG decorator
Import the dag and task decorators:
1
from airflow.sdk import dag, task
or
1
from airflow.decorators import dag, task
Define any functions you need for your tasks:
1
2
3
4
5
def _task_a():
    print("Hello from task A")

def _task_b():
    print("Hello from task B")
Define the DAG object:
1
2
@dag(schedule=None)
def my_dag_decorator():  # this will be the name (unique identifier) of the DAG
As a best practice, keep the name od the DAG the same as the filename.
Define tasks (operators):
1
2
    task_a = PythonOperator(task_id='a', python_callable=_task_a)
    task_b = PythonOperator(task_id='b', python_callable=_task_b)
Define tasks dependencies:
1
task_a >> task_b  # task_a is called upstream, task_b is called downstream
Always call your dag function at the end of the file:
1
my_dag_decorator()
The @dag decorator is a DAG factory – it returns a DAG object when called.
Complete script:
1
2
3
4
5
6
7
8
9
10
11
12
13
14
15
16
17
18
from airflow.sdk import dag, task


def _task_a():
    print("Hello from task A")

def _task_b():
    print("Hello from task B")


@dag(schedule=None)
def my_dag_decorator():
    task_a = PythonOperator(task_id='a', python_callable=_task_a)
    task_b = PythonOperator(task_id='b', python_callable=_task_b)

task_a >> task_b

my_dag_decorator()
Using the context manager
Import the DAG object:
1
from airflow.sdk import DAG
Define any functions you need for your tasks:
1
2
3
4
5
def _task_a():
    print("Hello from task A")

def _task_b():
    print("Hello from task B")
Open a DAG context:
1
2
3
4
with DAG(
    dag_id="my_dag_context",
    schedule=None
):
Define tasks (operators):
1
2
    task_a = PythonOperator(task_id='a', python_callable=_task_a)
    task_b = PythonOperator(task_id='b', python_callable=_task_b)
Define tasks dependencies:
1
task_a >> task_b
Complete script:
1
2
3
4
5
6
7
8
9
10
11
12
13
14
15
16
17
18
from airflow.sdk import DAG


def _task_a():
    print("Hello from task A")

def _task_b():
    print("Hello from task B")


with DAG(
    dag_id="my_dag_context",
    schedule=None
):
    task_a = PythonOperator(task_id='a', python_callable=_task_a)
    task_b = PythonOperator(task_id='b', python_callable=_task_b)

task_a >> task_b
Using the standard constructor (old way, not recommended)
Import the DAG object:
1
from airflow.sdk import DAG
Define any functions you need for your tasks:
1
2
3
4
5
def _task_a():
    print("Hello from task A")

def _task_b():
    print("Hello from task B")
Define the DAG object:
1
2
3
4
my_dag_standard = DAG(
    dag_id="my_dag_standard",
    schedule=None
)
Define tasks (operators):
1
2
task_a = PythonOperator(task_id='a', python_callable=_task_a, dag=my_dag_standard)
task_b = PythonOperator(task_id='b', python_callable=_task_b, dag=my_dag_standard)
Note how you need to assign every task to your DAG.
Define tasks dependencies:
1
task_a >> task_b
Complete script:
1
2
3
4
5
6
7
8
9
10
11
12
13
14
15
16
17
18
19
from airflow.sdk import DAG


def _task_a():
    print("Hello from task A")

def _task_b():
    print("Hello from task B")


my_dag_standard = DAG(
    dag_id="my_dag_standard",
    schedule=None
)

task_a = PythonOperator(task_id='a', python_callable=_task_a, dag=my_dag_standard)
task_b = PythonOperator(task_id='b', python_callable=_task_b, dag=my_dag_standard)

task_a >> task_b
Be careful to give unique names to all your DAGs. If two DAGs share the same name, Airflow will randomly parse one of them.
Mandatory and optional DAG parameters
dag_id
The only mandatory DAG parameter. It must be set explicitly when using the DAG class. If using the @dag decorator, the function name is used as the dag_id by default.
There is a bunch of recommended but not required parameters. Their default values or behavior may differ based on the Airflow version and configuration.
start_date
The date at which the DAG starts being scheduled (also: the timestamp from which the scheduler will attempt to backfill).
1
2
3
4
5
from pendulum import datetime

@dag(
    start_date=datetime(2024, 1, 1),
    ...)
schedule
How often the DAG runs. Some of the most commonly used schedules are:
None → don’t schedule, the DAG will have to be run manually (through UI, API or CLI)
@daily → run every day at midnight
@continuous → run as soon as the previous DAG run finishes (note: this is not real-time processing)
Use duration object to schedule the DAG to run every x days, e.g. run every 3 days:
1
2
3
4
5
from pendulum import duration

@dag(
    schedule=duration(days=3),
    ...)
If a schedule is set for a DAG, the start_date becomes mandatory.
catchup
If you set catchup=True the scheduler will run all non-triggered DAG runs from the past (since the start_date).
From Airflow 3, the default behavior is CATCHUP_BY_DEFAULT=False. This parameter can be changed globally or at the DAG level.
default_args
These are the arguments that will be passed to all tasks in a DAG. They can be overriden at the task level. They are defined in a dictionary, e.g.:
1
2
3
4
default_args={
    "depends_on_past": False,
    "retries": 1,
    (...)
DAG Runs
A DAG Run object is an instance of a DAG. Any time the DAG is executed, a DAG Run is created.
DAG Run properties:
run_id→ unique ID of a DAG Rundata_interval_startlogical_datedata_interval_end
Possible DAG Run states:
queuedrunningsuccess/failed
By default, 16 DAG Runs of the same DAG can run at the same time.
Active DAGs → unpaused, ready to be scheduled
Running DAGs → currently running
Topic 3: Dependencies
Defining tasks
In Airflow 3, there is a new way of defining tasks using @task decorator.